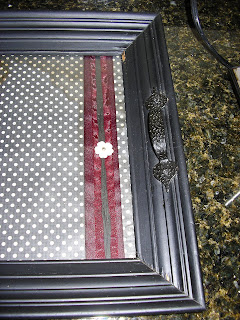
So, I totally had this wonderful plan to do a tutorial on how to make a tray out of a frame, but I was a dimwit and forgot to take any before and during pictures. So, how does one do a tutorial?...Without many pictures :)
#1.First things first. You need a frame. Anyone that is an 8x10 or bigger. Usually bigger. Preferably one that is more retangular than it is square.
We'll pretend this is the way my 'tray' looked before. Which is probably close: $2 from the thrift store.
Of course, this particular frame is the smallest I would ever go, but I guess it depends on where you want to use the tray and how you're going to use it.
#2. Next. Sand that bugger (Now use your imagination and picture someone sanding)
#3. Then. Prime and spraypaint (Once again, us that imagination :) )
#4 Once everything is dry. Do a little distressing:
(This is obviously the finished pic, but you get the point)
As always, I used my furniture touch up pen to stain the distressed areas. Works like a charm every.single.time.
#5 Add hardware:
I found the flattest or most adaptable part of the frame I could to screw these bad boys in to -one of each side of course. :)
#6 Now, this step isn't a 'have to' but I decided to start doing it on all of my trays ever since the mishap of my coffee overflowing off the coffee pot, onto the tray, and seeping its way through the paper below. As illustrated:
Can you tell? It's just a weebit discolored.
So, to stop this from happening. I use Silicone to make a waterproof barrier between the glass and the frame:
#7 Next, find whatever paper/fabric/whatever.the.heck.you.want.to.look.at.through.the.top to add to the frames original backing (I usually throw away the original artwork, incase you were wondering) I just sprayed spray-adhesive to the back of the paper then pressed it on the backing.
#8 Next up. Assemble
#10 Now find a place to display it!
From previous experience, when picking the frame you want, try to find one that has some height or depth to it. It makes it more eye catching and appealing...and useful especially if its really deep.
As you can see, I went for a frame that had some good height to it. Loooove it :) For a few other specimans, check out this post.
Next Step....your turn!


I always wondered how to keep the paper underneath from getting messed up. We're spillers around here. Great tip!
ReplyDeleteThat is absolutely gorgeous! I made a tray out of a frame a few months ago and I love yours better! :)
ReplyDelete~Tana
Your tray has turned out beautifully. What a great idea! I have tons of old frames in my house, here is a way to reuse some of them. Thanks. (stopping by via ASPTL)
ReplyDeleteI love this! It's awesome. And so easy! Who knew?!? Great job!
ReplyDeleteLuv what you did here...looks outstanding! Hope you ahve a FUN week:)
ReplyDeleteBlessings,
Linda
The finished tray is really pretty! I'll be on the lookout for suitable frame to make one. Thanks!
ReplyDeleteSarah
OMG, what a great idea to use silicone! I may make a tray out of one of the 5,689 frames in my back room this weekend!
ReplyDeleteThanks for sharing!
Oh, this is ca-ute! And I love the diamond pattern you chose. Thanks for sharing...love your blog!
ReplyDeleteJust found your blog and love it! I would like to feature this idea on my blog...please let me know if that would be okay. Thanks!
ReplyDeleteendlesscrafting.blogspot.com
This is so cute...thanks for sharing.
ReplyDeleteYour newest follower, Jessica
myworldmadebyhand.blogspot.com
This is just beautiful! Such a great idea to use it to hold an arrangement of pretty things. Love it!
ReplyDeleteThanks for the great tutorial. I gave this a try on my own frame this weekend and I LOVE how it turned out. I just read over your tutorial again though and realized I should probably go back and do the silicone trick, just in case. :) Thanks again for the wonderful idea!
ReplyDeleteLOVE THIS! Great way to upcycle an old frame! So chic! You should totally enter this project in Craftbaby's 'Upcycle Challenge'! http://www.craftbaby.com/contests/3/upcycle-it-sweeps
ReplyDeleteThis is beautiful! I love this idea- I might just stop right now and go create one!
ReplyDeleteGreat idea! I have tons of empty frames - I'll have to see if I can find one that will work well for this. So glad I found your site today - You've sucked me right in :)
ReplyDeleteThe local goodwill has a good supply of old/vintage frames, and a nice size too to an actual size tray I helped make one of these a few months ago, but i chose to leave the back of the frame on the bottem, so that the tray still had depth...looks real nice on oversized automan, or coffeetable.
ReplyDeleteGreat idea! I'm going to leave mine so that I can change the inside paper to match the seasons! I hadn't thought about using it as a tray until I saw yours! Thanks!!
ReplyDeleteTracy