This post is a collaboration with 3M DIY. To keep up-to-date on projects, products and sampling visit 3MDIY.com.The content, project and opinions are 100% mine.
I started to realize the other day that I'm totally under utilizing my porch. We have a great porch, but I have really never done much with it besides the occasional potted plants and a wreath on my door. I decided that it needed to be more inviting because well...concrete, stone, and stucco are pretty much the antithesis of inviting.
For some reason, I never thought to put a bench by the door...which is sad, because there's a perfect spot for it, like it was made to have a bench. Figures it would take me over 4 years to notice it lol. I guess that's what happens when you really never use your front door, right? And on that note...not using my front door also means that I don't get to see all the cobwebs and bugs and grossness...so...maybe I'll start having to look at my front door/porch a little more often lol. It's funny that I worry about and decorate the inside of my house all the time, but never really care about the entry into my house.
So on my course to making it more inviting, is of course building a bench for it :) Here are the supplies you'll need to make this bench:
Four 1x2 cut at 18" (legs)
Four 1x2 cut at 18" (legs)
Four1x3 cut at 18" (legs)
Two 1x3 cut at 10" (bottom side support)
Two 1x4 cut at 37" (top side support)
Two 1x4 cut at 10" (top side support)
Two 1x2 cut at 23" on the long side and the edges angled cut at 36 degrees and 50 degrees.
One 1x2 cut at 38.5" (top center support)
One 1x12 board cut at 48"
Wood Glue
Drill/screws/counter sink bit
Wood Glue
Drill/screws/counter sink bit
ScotchBlue Drop Cloth
Paint
Polycrylic
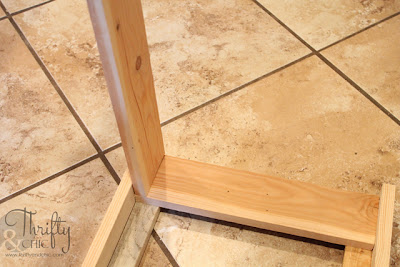
Step 1. Take one 1x3 and one 1x2 piece. Stack the 1x2 on top of the 1x3 edges meeting so that it creates a 90 degree angle. Secure this in place with the wood glue.
Step 2. Do this to all the pieces. You should have 4 'legs' once you're done. Let them dry and then counter sink 1 inch or 3/4 inch screws into the top and bottom of each piece to make sure its secure.
Step 3. Lay two legs down facing each other. Place a 1x4 cut at 10 inches on the top of each one. Secure each leg to the end of the 1x4 using a 3/4 screw. Do this with the other two legs and other 1x4. Make sure the edges are flush.
Then secure a piece of a 1x3 cut at 10 inches on the bottom portion 2 inches from the bottom.
Step 4. On one set of legs, take a 1x4 cut at 37 inches and secure to the top of the leg, perpendicular to the 1x4 you placed in step 3. Do it to the other side also.
Step 5: Now connect the 1x4 ends to the other set of legs. Now you should have your base.
Step 6: Secure the 1x2 center support to the top portion of the base 5" in...or in the middle. If you cut it correctly, it should be a good fit, so shimmy it in, and then countersink a 1" screw into each side.
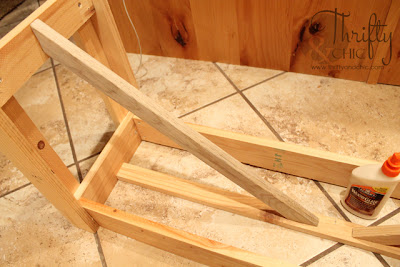
Step7: Take the angled supports, and wood glue them into place along the bottom 1x3 support and the center 1x2 top support. I didn't have mine meet in the middle, they are about 1 inch each from the middle mark of the top. If you want them to meet in the middle, you'll have to change your angles. The easiest way to secure these, is have the bench turned upside down, then place the wood glue on the ends. Center the 1x2 on the 1x3 and 1x2 supports. Let the wood glue dry. Then secure with a screw on both ends...the wood glue is key here :) Then it won't be moving around on you when you are trying to screw them in.
Step 7: Place the 12" board on top, making sure that it is equidistant on each overhang. Secure with wood glue and then countersink 1" screws into the top.
Step 8: Fill each hole with 3M Wood Filler , apply with a putty knife...or use your fingers :)
I used the natural color on the bare wood, and then white on the top since my top was already painted. These are stainable and paintable...and good for outdoors too :) So perfect. Make sure it's had time to cure before you go to step 9.
Step 9: Now take 3M SandBlaster Sandpaper in 120 grit. to smooth the grain of the wood
... and to smooth over the holes you just filled.
If you need a little more 'giddy up', then you can put these on your hand sander and let it do the work :)
Step 10: Take a drop cloth, I used the ScotchBlue™Drop Cloth, put your bench on it and start painting! Or staining :)
And on the painting or staining note...I started thinking of it, and I hate that painting isn't as easy as staining. But I hate the staining is messier (for the most part)...and smellier than painting. But in reality...if they had a white stain that covered like paint, I would totally use it. I really hate painting lol. I think I'm going invest in a paint sprayer, then at least it will be somewhat fun, right?
Step 11: Optional. Distress to your liking, I used the 3M Advanced Abrasives Sanding Pad in 60 coarse grit to rough up the edges a little bit
Step 12: Seal with Polycrylic or Polyurethane
Now to put it out on the porch. See? Perfect spot. It was meant to have a bench. Now maybe people will start using it, instead of standing up in the entry way and falling over half the time when I ask them to take off their shoes :)
...of course I say that, and then put pumpkins all over it lol
And I'm not against putting an indoor rug outside on my porch...I thought it might be weird, but it totally worked. I love it. Luckily it really feels like it could be an outdoor rug...we'll see how it holds up :) Totally beats having just a small 2x3' rug that most door steps have...and mine use to have.
And now you get to see the aftermath of the paint...well, just a little bit of it, I tried to take most of it off. But here's the pup...and the paint all on his ear...and some on his tail which you can't see. At least he didn't step in it this time. I guess that's what I get for painting in the kitchen.
To check out some other great projects and how to use 3M's wonderful products visit the 3M DIY Twitter Page and the 3M DIY Facebook Page.
This post is a collaboration with 3M DIY. To keep up-to-date on projects, products and sampling visit 3MDIY.com.


 .
.


 and the


That is so cute! I like the two support pieces going from the center out. The lines look very cool from the front! Your porch looks so festive!
ReplyDeleteLaura
HA! You got paint on the dog! My dog always wants to help so I have to chuckle. Been there! Love the bench btw. I need one myself and have been waiting for other more pressing projects to be completed first. Will definitely save this plan. It looks manageable! ;-)
ReplyDeleteYour porch is beautiful! Where did you get the huge lantern? I love it!
ReplyDeleteI got it from Hobby Lobby last year. They have a ton of cute lanterns :)
Delete