So out with the old...in with the new! I wanted to make this new table a little longer and not so wide. We barely have enough room to walk between the side table and the wall into our dining room, so I figured to solve the problem, the new side table needs to be much more slender.
Here is what you will need for this project:
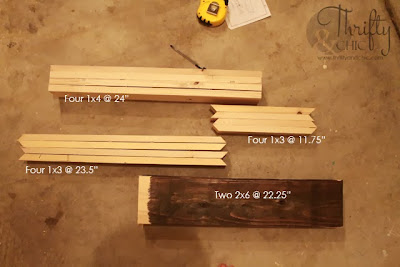
4 1x3 pieces cut at 22.25" with a miter cut of 45 degrees (measure at shortest end).
4 1x3 pieces cut 10.5" at with a miter cut of 45 degrees (on the shortest end). This is going off the width of my two 2x6s, make sure you measure your 2x6s first to get the exact measurement you need since not all wood measures the same width.
4 1x4 pieces cut at 24"
2 2x6 pieces cut at 22.25" (random length, but this was because they were scraps :) )
scrap wood (probably about a 1x3 cut at 1 inches, need two of these for support)
Step one:
Place two of the longer 1x3 pieces on a level surface. Place a 1x4 piece on top. The 1x3 pieces should be at the top and bottom of the 1x4. Secure the 1x4 an 1.5 inches down from the top of the 1x3, and flush with the bottom of the bottom 1x3 piece. To secure, glue these in place and then screw in a 1 inch wood screw. Do this with to the other side with the second 1x4 piece.
Now do this again with the other two 1x3s and 1x4s, creating a second set of legs.
Step two:
Take the shorter 1x3s and place them against the angled edges of the 1x3s on one of the sets of legs. Secure into place using wood glue and a nail gun. If you don't have a nail gun, wait for the wood to dry and then secure with a screw.
Step three:
Take the two sets of legs and join them together by securing the shorter 1x3s to the angled edges on the second set of legs. Use wood glue and a nail gun to secure into place.
As you are doing this, make sure that the tops are the pieces that have the 1x4 connected 1.5 inches down from the top.
Step four:
Secure the one inch 1x3 pieces 1.5 inches from the top on the two shorter edges. Do this with wood glue and screw.
Step five:
Sand and paint. If you want two different colors, like mine, this is where you will paint the base and stain the top pieces. Mine were already stained, so all I had to do was paint the base. As for the sanding, I made sure the corners were super rounded just for safety sake. The babe has enough bruises on her head already from standing up and falling all the time, I don't really want to add to them.
Step six:
Place your 2x6 pieces into the base. Mine were a really really tight fit, so it took some time getting them in, but they fit perfectly. If you are having trouble, make sure that your boards aren't bigger than your base. If they should fit, try pushing them in with all your weight....or use a hammer if need be :)
Easiest table to date? Probably. I love how long and skinny this is. I wish it was a little bit longer though; I was just using some scrap pieces I had laying around. If I were to do it again, I would make this as long as the couch side. Maybe another project in the near future :) Also, a second shelf might make an appearance.
And a final beauty shot because my living room is never this clean. Baby toys are usually everywhere...in fact, I think you may be able to see one or two under the couch if you look closely.
Now that this is done, let's see if I can finish the other table that's been in the works for over two months :)
As for the cost:
One 1x4 = approx. $3
Two 1x3 = approx. $3
One 2x6 = approx $3 or $4.
So, about a $10 table!


Great tutorial and end table. Your living room is really amazing.
ReplyDeleteLooks great. Thanks for the tutorial. Coming over from TT&J.
ReplyDeleteI like the way the house being designed. I like it.
ReplyDeleteI may make these a little wider so an ikea basket can fit underneath it and use it as nightstands! yet another project I'll need your help with ;)
ReplyDelete